On This Page
Image classification using OpenCV
On This Page
In Deep Learning with OpenCV blog, we talked about using pre-trained model provided in OpenCV 3.3 to classify images or even videos(real-time webcams, video files, etc.). In this blog, we’ll deep-dive into image classification using OpenCV and GoogleLeNet (pre-trained on ImageNet) using the Caffe framework.
The GoogleLeNet architecture (now known as “Inception” after the novel micro-architecture) was introduced by Szegedy et al. in their 2014 paper. Going deeper with convolutions
Import required libraries
1
2
3
4
5
# import required libraries
import cv2
import numpy as np
import argparse
import time
Above Line 2-5 imports required packages for this tutorial.
cv2: OpenCV librarynumpy: Python numerical computation libraryargparse: Required to parse command line argumentstime: Use to track time spent on specific code
Parse command line arguments
1
2
3
4
5
6
7
# Parse command-line arguments
ap = argparse.ArgumentParser()
ap.add_argument('-i', '--image', help="Path to input image", required=True)
ap.add_argument('-p', '--prototxt', help="Path to Caffe 'deploy' prototxt file", required=True)
ap.add_argument('-m', '--model', help="Path to Caffe pre-trained model", required=True)
ap.add_argument('-l', '--labels', help="Path to ImageNet labels (i.e. syn-sets)")
args = vars(ap.parse_args())
Above Line 3-6 parses required command line arguments:
image: Path to image for classificationprototxt: Path to Caffe “deploy” prototxt filemodel: Path to Caffe pre-trained model’s weightslabels: Path to ImageNet labels
Load input image and class labels
1
2
3
4
5
6
# Read image from argument
image = cv2.imread(args["image"])

# Load class data for ImageNet
rows = open(args["labels"]).read().strip().split("\n")
classes = [r[r.find(" ") + 1:].split(",")[0] for r in rows]
Line 2 loads image from path to memory
Line 5-6 loads class labels for ImageNet into memory. rows will contain rows like this:
n01440764 tench, Tinca tinca
n01443537 goldfish, Carassius auratus
n01484850 great white shark, white shark, man-eater, man-eating shark, Carcharodon carcharias
n01491361 tiger shark, Galeocerdo cuvieri
n01494475 hammerhead, hammerhead shark
n01496331 electric ray, crampfish, numbfish, torpedo
n01498041 stingray
n01514668 cock
n01514859 hen
n01518878 ostrich, Struthio camelus
And, classes contains following classes processed from above raw rows:
tench
goldfish
great white shark
tiger shark
hammerhead
electric ray
stingray
cock
hen
ostrich
Using dnn module from OpenCV library
Load blob from image in memory
1
2
3
4
5
# Our CNN requires fixed spatial dimensions for our input image(s),
# so we need to ensure it is resized to 224x224 pixels while performing
# mean subtraction (104, 117, 123) to normalize the input; after executing
# this command, our "blob" now has the shape: (1, 3, 224, 224)
blob = cv2.dnn.blobFromImage(image, 1, (224, 224), mean=(104, 117, 123))
Load model from disk using args
1
2
3
# Load serialized model from disk
print("[INFO] Loading model from disk")
net = cv2.dnn.readNetFromCaffe(args["prototxt"], args["model"])
Make a forward pass with image blob into model
1
2
3
4
5
6
# Forward propagate image through the network
net.setInput(blob)
start = time.time()
preds = net.forward()
end = time.time()
print("[INFO] Classification took {:.5} seconds".format(end - start))
In Line 2, we set the input to be passed in model and in Line 4, we make a forward pass through the network.
Fetch top-5 predictions
1
2
# Sort the indexes of the probabilities in descending order (higher probability first) and grab the top-5 predictions
idxs = np.argsort(preds[0])[::-1][:5]
Above Line 2 will give us top-5 predictions out of all predictions from the model.
Display predictions onto the input image using OpenCV
1
2
3
4
5
6
7
8
9
10
11
12
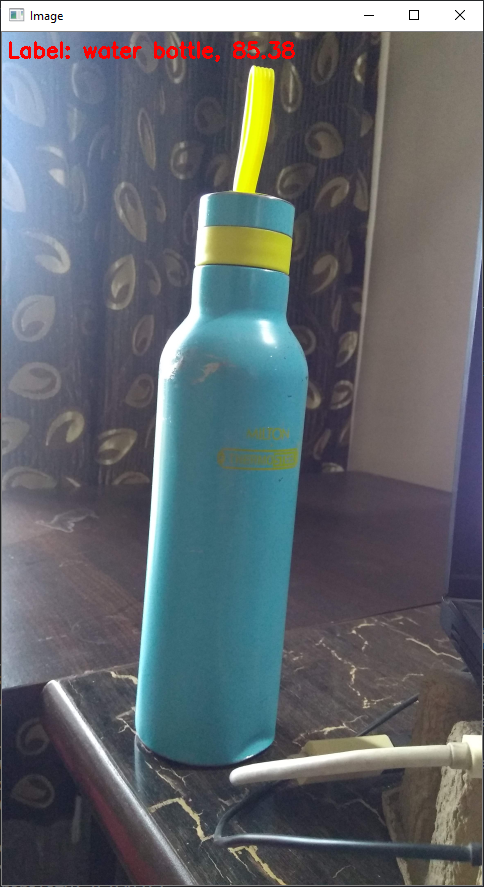
# Display top prediction
for (i, idx) in enumerate(idxs):
# draw the top prediction on the input image
if i == 0:
text = "Label: {}, {:.2f}".format(classes[idx], preds[0][idx]*100)
cv2.putText(image, text, (5, 25), cv2.FONT_HERSHEY_SIMPLEX, 0.7, (0, 0, 255), 2)
# display the predicted label + associated probability to the console
print("[INFO] {}.label: {}, probability: {:.5}".format(i+1, classes[idx], preds[0][idx]))
cv2.imshow("Image", image)
cv2.waitKey(0)
Above Lines will take top prediction and then draw text on the input image using OpenCV’s imshow.
Run python script to classify any image
1
python image_classification.py --image {Path to image} --prototxt {Path to .prototxt} -m {Path to .caffemodel} -l {Patht to synset_words.txt}
Results

Github repo link
Find the complete Python script in Github repo
Comments
Be the first one to comment on this post.